Installing Debian on my Ben Nanonote
8 minutes read | 1669 words by Ruben BerenguelYes, that’s me with a polariser.
Wait, playing Dungeon Crawl
in your Nanonote?
Installing Debian on the Ben is pretty easy after the work of the people at pyneo.org. I follow mostly their instructions which can befound here.
The first step is installing the package xburst-tools, following the instructions from the Qi Hardware Wiki about reflashing your Ben Nanonote.
The package can be downloaded in .deb format for Debian-like distributions. As I am usually in Arch Linux, I installed the confuse library with pacman -S confuse , downloaded the package tarball and uncompressed it, following the instructions therein. The only drawback is that uncompressing the tarball puts the executable files in binary directories which are not in my path, and to use usbboot (the main program talking to the Ben waiting to be reflashed) I had to use global paths. No big deal, though.
After getting this program, you’ll need the boot image and the kernel, which can be found in the Qi Hardware’s site as Nanonote software repositories (latest) Be sure to pick one file named (something like) openwrt-xburst-qi_lb60-u-boot.bin (the boot part), and openwrt-xburst-qi_lb60-uImage (kernel image). If you want to have sound enabled in your resulting Debian system, be sure to pick also the file openwrt-xburst-qi_lb60-rootfs.tar.gz (this may be deprecated after changes in the OpenWRT build process)
Now you have the boot and kernel, you’ll need to download a Debian rootfs prepared for the Ben. You can find one for Debian-Lenny in the Pyneo.org page, get it with either
wget http://pyneo.org/downloads/nano/debian-lenny-mini.ubi
wget http://pyneo.org/downloads/nano/debian-lenny.ubi
The image I use is a debian-sid which you can get with
You could also follow the instructions in Qi Hardware wiki about debootstrapping any distribution for the Ben NanoNote, but it will be harder and messier.
Now you have all the ingredients to install Debian on your Nanonote.
Be sure to have it shut down and connect it with the supplied cable (directly to your computer, no USB hubs whatsoever) and start it in USB boot mode (by pressing U and the power button). Run lsusb (list USB devices) in your console to check for changes, when 601a:4740 appears (or something like Ingenic LB60, depending on your system), you are ready to do the following (as root or using fakeroot).
In what follows, path-to-loader is the path to the u-boot file, path-to-kernel to the uImage and path-to-rootfs the path to the ubi file with the filesystem (you should use the Debian you just got,
but could use Qi Hardware’s OpenWRT image.
usbboot -c “boot”
usbboot -c “nprog 0 path-to-loader 0 0 -n”
usbboot -c “nprog 1024 path-to-kernel 0 0 -n”
usbboot -c “boot;nerase 16 1024 0 0”
usbboot -c “nprog 2048 path-to-rootfs 0 0 -n”
Don’t skip step 4: I thought that the nerase part wasn’t needed as I was just overwriting the filesystem, but if you don’t, it won’t work and you will be left wondering what is up.
Now unplug your Nanonote, remove the battery and put it again (it is the easiest way to restart it 100% sure). Boot it up and you should get a nice Debian prompt after the kernel loading screen (which will still show OpenWRT’s logo).
You are done! No, not really. This barebones system needs something useful. More so, networking and sound enabled!
Getting sound working in your Ben NanoNote with Debian
To get working sound I used a microSD card, if you don’t have one you will need to set up networking and some scp enabled system in your Nano.
To get sound working, uncompress the rootfs.tar.gz in your /tmp/ directory. Then copy everything from /tmp/lib/modules/kernelversion/ to your card or Nanonote. In my case, kernelversion was 2.6.32.16. In your Ben, create a directory named kernelversion in /lib/modules/ and copy everything in this newly created directory. The files you just copied are the kernel modules to get sound working.
Run depmod /lib/modules/kernelversion/*.ko This will generate (among a few others) modules.dep in /lib/modules/kernelversion/. You are ready to go! Edit /etc/modules and add snd-soc-qi-lb60 at the end of the file and issue a reboot. You should see the following when the kernel ends its boot up steps:
No device for DAI jz4740-i2s
asoc: jz-codec <-> jz4740 mapping ok
Sound should be working, although you will need some alsa magic to get it to do something. For it, we will need networking. By the way, Debian with sound enabled as a kernel module takes around 17 seconds to boot in my Nanonote.
Networking in your Ben Nanonote
Now you need networking to check if sound really works, we’ll get some useful software in the Ben along the way.
I have successfully set up this in both Linux and MacOS hosts. Start by plugging your Nanonote to your host with the supplied cable. We will configure the host system first, then the Nanonote.
For Linux
You may need to be root to do this, I don’t remember. First you’ll need to enable network forwarding with
echo “1” > /proc/sys/net/ipv4/ip_forward
Now you set up the network interface with
ifconfig usb0 192.168.100.1 up
This is it for Linux hosts, at least this was enough for me in Arch Linux. The wiki page on Networking in your Ben NanoNote has a little more information in case this does not work.
For MacOS
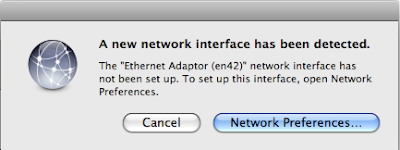
When you plug your Nanonote, a network preferences alert will pop up, asking you to go to Network preferences, like this one:
There is a catch, though: it may fail to appear. To get it to appear then you have to start playing with power up power down your Nano and switching USB ports. I’m not the only one with this problem, agrajag also pointed it out.
I got my Mac to forget about previous connections by using a USB hub to plug the Nano, then unplug it and plug again in the usual spot. Rebooting the Mac also solves it.
CAUTION: I tried to use a hub to connect to internet, and after enabling internet sharing my Nano ran out of memory and ended kernel-panic-ing.
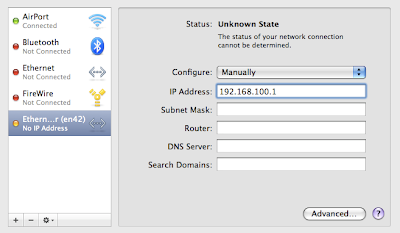
Go there and set up the newly discovered ethernet adaptor and assign an IP manually: fill in with 192.168.100.1
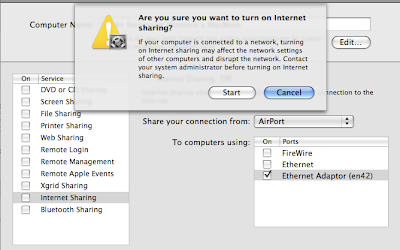
Now go to the System Settings pane and open Sharing. Enable sharing your internet connection with the newly discovered ethernet device and apply, like the following
Common steps in the Ben Nanonote
First set up the network interface with
ifconfig usb0 192.168.100.2 up
And enable a network gateway through your host system
route add default gw 192.168.100.1
Now point your DNS server to Google’s DNS servers with (you’ll only need to do this the first time you try networking)
echo “nameserver 8.8.8.8” » /etc/resolv.conf
This should be it check with ping google.com and it should work if the host steps were done correctly.
Installing shiny new software
With the packages listed here (maybe you can add octave and some other programming lanaguages), the Ben Nanonote turns into one of the most complete (non-graphing) pocket calculators out there. In theory, you could use fim or fbi to display images generated by gnuplot to a framebuffer console… but I couldn’t manage to get it to work without either seg-faulting or crashing. You can also find a list of interesting packages and hacks in Marc Zonzon’s webpage.
Start by updating the system:
apt-get update
Now you are ready to fill it up. Recommended stuff (i. e. What I put no matter what). Small descriptions included.
emacs23nox The No-X emacs 23 build. It works pretty well in the Ben, even with just 32MB of RAM. Having emacs in your pocket is awesome.
zile Zile is lossy emacs. It is a quicker loading small clone of emacs. Mostly keybindings, but for quick edits it loads way faster than the full fledged emacs
fbterm Frame buffer terminal. With it, you can resize fonts with fbterm -s fontsize
crawl Dungeon Crawl Stone Soup, one of the best dungeon crawl games out there. To get it to work (albeit very slowly…) you will need an SD card ext2 formatted to get swap memory in it (more on this later)
nethack Works out of the box without needing swap hacks
yacas Yet Another Computer Algebra System. Sadly it is no longer maintained, but it is awesome what it can do in just a tiny machine like the Ben.
pari-gp The calculator for number-theoretic people. I have also ran some computations in Pari, its programming language is pretty simple and its high precision arithmetic routines are awesome
alsa- You will need all the family of alsa-utils, dev and so on. apt-cache search alsa and pick almost all.
madplay a command line music player I used in my powernap script
cron If you want to run something periodically you need cron
gcc Are you compiling something in your pocket or you are just happy to see me?
Caveat: You may see the dreaded Bus errorackage list 0% when apt-getting or updating. This usually solves by deleting /var/cache/apt/*.bin (or /var/apt/cache/*.bin) and apt-get update again. If this does not solve it, clean completely var/cache/apt (files and directories), reboot and apt-get update. This made the trick for me, if it does not for you… Well, you can try re-installing the system.
Swap
Okay, if you want to run crawl or just get short on memory, you will need either a swap partition or a swap file. As I am not into messing with partitions, I created a swap file. You will need an ext2 (or ext3 too, I think) formatted microSD card, mounted in /mnt/
dd if=/dev/zero of=/mnt/swap/swapfile bs=1k count=20480
mkswap /mnt/swap/swapfile
swapon /mnt/swap/swapfile
This will add a 20 MB swap file to your Nanonote memory. Currently I have a 50 MB one, previously I had 5 blocks of 10 MB that I swapped on when needed.
Before unmounting the card you will need to
swapoff /mnt/swap/swapfile
Happy pocket hacking!
Related posts:
![]() Gcal: the ultra-powerful command line GNU calendar
Gcal: the ultra-powerful command line GNU calendar
![]() Unpacking my Ben NanoNote
Unpacking my Ben NanoNote
![]() My first port to the Ben NanoNote: gnugo
My first port to the Ben NanoNote: gnugo
![]() Another Ben Nanonote port: pmars
Another Ben Nanonote port: pmars
ParseList(ScrambleList(Relateds(Linux, Programming)),10)


